Gosund WO1 Smart Outlet - Power Monitoring with Tasmota
Purchase the Outlet on Amazon (UPDATE: Rebranded link that works https://amzn.to/3HsScAo )
Especially in 2021 there really aren't many devices that you can flash over the air with Tuya Convert. The Gosund Smart Outlet is one of them. Features:
- Dual Outlets
- Dual Buttons
- Dual Relays
- Dual Relay Status LEDs
- Single channel dual Link LEDs
- ESP8285 for Tasmota!
- Power monitoring (both outlets combined into a single channel)
(take note iTead Sonoff!)
Even if you decided to flash it OTA, having that backup option for recovery is an awesome thing since the pads are pretty easy to get to with a Torx bit (no glue or breaking anything!)
One oddity with this outlet are the buttons. Instead of using the available GPIO pins on the ESP chip they tied them to the analog input on the ESP and the buttons pull down the A0 pin with two different resistor values. No, pushing both doesn't combine them, it just follows the least path of resistance of course. Don't just snag the template below and run, you need the Rule to control them!
After you flash your device and configure it to your WiFi go to the console and issue the following commands:
template {"NAME":"Gosound Outlet","GPIO":[320,0,576,0,2656,2720,0,0,2624,321,225,224,0,4704],"FLAG":0,"BASE":18}
rule1 on analog#a0<400 do power2 toggle break on analog#a0<800 do power1 toggle break endon
rule1 1
module 0
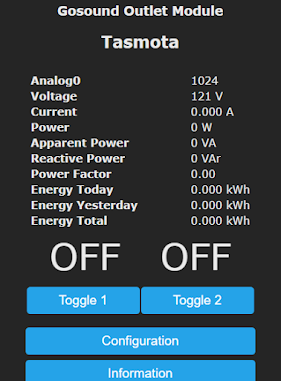
Give Tasmota a few seconds as the device will reboot to activate the template. Go to the Tasmota main menu and you should see something similar to the following:
Amazon UK - https://amzn.to/2TnG2R4
Amazon CA - https://amzn.to/2JWsNq5
Discord Chat - https://discord.gg/bNtTF2v
Patreon - https://www.patreon.com/digiblurDIY
Facebook - https://www.facebook.com/groups/digiblurdiy
Instagram - https://www.instagram.com/digiblurdiy
Please note that links above may be an affiliate link, utilization could earn digiblurDIY a small commission of most purchases and helps with future video projects. Thank you!


Still waiting for Amazon Canada to carry these!
ReplyDeleteI paid some extra to get one brought in from the US and set up worked great. Did you by chance figure out what GPIO the buttons are? I played around and can't get the buttons functional on the device.
ReplyDeleteI posted them up there on how to get them working.
DeleteTried it initially and nothing happened. Reflashed the bin on the device and worked like a charm. Thanks :)
DeleteFor anyone who wants the relays always on with no control, `PowerOnState 4` should do the job. I haven't figured out a way to capture the button presses separately yet. I was hoping they'd be exposed in HA.
ReplyDelete