Posts

Showing posts from 2019

Update of digiDIM Tasmota Bins 8.1.0.1

For the folks using the awesome  Martin Jerry SD-01  and  Tessan / Acenx  MJ-SD02 dimmers, I've updated the fork to 8.1.0.1.  Keep in mind due to the settings layout of 8.x of Tasmota, if you need to downgrade below 7.2 you will need to serial flash. More info on setup/flashing to be  found here .

Amcrest PTZ Speed Dome Camera - 12x Optical Zoom - Integrated with Home Assistant and Blue Iris

Image
The Amcrest 1080P Pan Tilt Zoom Security Camera with 12x optical zoom. POE+, WiFi, and 4MP models available. The optical zoom and the ability to zoom into dark areas and see is pretty impressive. Utilizing the HomeAssistant streaming integration you can also control the camera via automations with all local control commands and RTSP & ONVIF. Models 1080P POE+ IP2M-853EW 4MP POE+ IP4M-1053EW 1080P WiFi IP2M-858W Home Assistant Integration - https://www.home-assistant.io/integrations/amcrest/ Amcrest Firmware - https://amcrest.com/firmwaredownloads Products We Use/Recommend Amazon US - https://amzn.to/2YZNDeO Amazon UK - https://amzn.to/2TnG2R4 Amazon CA - https://amzn.to/2HchPZe Come chat with us! Discord - https://discord.gg/bNtTF2v Patreon - https://www.patreon.com/digiblurDIY #Amcrest Camera Models IP2M-853EW IP2M-858W IP4M-1053EW Links to products provided through the Amazon Affiliate program.

Sonoff iFan03 Install with Complete Fan Speed Control

Image
Utilizing two dimmers in a 3 way configuration or even a standard 2 way, you can control the iFan03 with full speed and light control from the wall.  You also get visual and audio representation of the fan speeds and not to mention the remote still works! Products Used Sonoff iFan03 Martin Jerry Dimmer Acenx Alternate Faceplate Dimmer iFan03 (Aliexpress) 5uF Capacitors (10 pcs) 5uF Capacitors (2 pcs) Links provided by eBay Partner Network. Yes the caps fit without modifying the board or case! See below for pics. Tuya-Convert Process - https://www.youtube.com/watch?v=dyUyewiKpRA Martin Jerry Dimmer Fork and Setup - https://github.com/digiblur/Tasmota Smart Bulb Project Mentioned - http://www.hackspace.io/?p=327 If you use the below rules with the "if" commands, a Tasmota bin compiled with Expressions/If commands is required.  Install the full-rules bin file here  Rules (iFan03) Rule1 on fanspeed#data=0 do backlog buzzer 1,5 ; publish cmnd/fandims/dimme

How to Control Smart Light Color and Brightness with a Dimmer - Tasmota Tips Episode 5

Image
You heard right! We show you how to use a wall mounted dimmer to control your smart lights! This gives you the best of both worlds. You can also change the color temperature too with long press actions. Products Used Lohas RGB+CT Lights MJ Dimmer Optional Bench Power Tester Tuya-Convert Process - https://www.youtube.com/watch?v=dyUyewiKpRA Sample Rules rule2 on power1#state do publish cmnd/lohastest_new/power %value% endon          on dimmer#state do publish cmnd/lohastest_new/dimmer %value% endon rule1 on switch3#state=2 do dimmer + endon          on switch2#state=2 do dimmer - endon          on switch2#state=3 do publish cmnd/lohastest_new/ct - endon          on switch3#state=3 do publish cmnd/lohastest_new/ct + endon rule1 on switch3#state=2 do dimmer + endon          on switch2#state=2 do dimmer - endon          on switch2#state=3 do publish cmnd/lohastest_new/ct 153 endon          on switch3#state=3 do publish cmnd/lohastest_new/ct 500 endon Get the Produc

Tuya Convert 2 - Flash Tuya Smartlife Devices - No Soldering - Remove the cloud with Tasmota ESPHome

Image
Welcome back to flashing your devices without any soldering or opening of devices!  Flash Smart switches, plugs, lights, sockets and more with ease!  This process allows you to flash your previously locked out devices that wouldn't flash before on the original version of Tuya Convert.  TC will convert both older and newer firmware devices automatically.  Use your Raspberry Pi, Linux PC, Proxmox, etc to unlock all the amazing features of open source firmware.  Protect your privacy and data and keep it in your home. Raspbian Buster Lite Download - https://www.raspberrypi.org/downloads/raspbian/ Etcher Link - https://www.balena.io/etcher/ Putty Link - https://www.chiark.greenend.org.uk/~sgtatham/putty/latest.html Parts List Raspberry Pi 3 32gb Micro SD Card Fliirc Case (optional: great RPi heat sink case) Raspberry Pi 3 Kit (UK) Tuya based favorites Martin Jerry Dimmer Martin Jerry Switch Martin Jerry 3 way Moes 3-Way Smart Switch 4 pack Smart Bulbs 4 pack Smart P

How to Control a Smart Light with a Smart Switch - Tasmota Tips Episode 3

Image
Don't cover up the light switches!  Control your smart lights from the wall and keep the best of both worlds.  Regain your sanity and score a high Wife Approval Factor by learning how to control your smart RGB lights from the wall.  Switches Teckin SR-41 - https://amzn.to/2qFgrJh Martin Jerry - https://amzn.to/34Rd3tl Tuya-Convert Process - https://www.youtube.com/watch?v=dyUyewiKpRA Smart Bulb Comparison - https://www.youtube.com/watch?v=MnmUPF5rRro Rules referenced in the video rule1 on switch1#state=2 do publish cmnd/BT_TeckinSB50/power toggle endon rule2 on System#Boot do Var1 0 endon on Switch1#State=3 do add1 1 endon on Var1#State>=2 do Var1 0 endon rule3 on Var1#State==0 do publish cmnd/BT_TeckinSB50/dimmer 15 endon on Var1#State==1 do publish cmnd/BT_TeckinSB50/dimmer 100 endon Get the Products We Use/Recommend Amazon US - https://amzn.to/2YZNDeO Amazon UK - https://amzn.to/2TnG2R4 Amazon CA - https://amzn.to/2HchPZe Come chat with us! Discord

Sonoff S31 - UL Listed - What's different?

Image
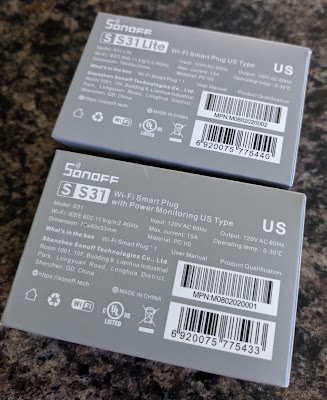
I recently picked up the Sonoff S31 and Sonoff S31 Lite smart plugs that are UL Listed.   They new S31's bear the UL listed logo on the box and the back of the unit itself.  Let's crack them open and see what makes them tick. The Lite version is the same plug except it does not bring any power monitoring capabilities to the table.  With all new hardware revisions of various products I was worried that my favorite smart plug was going to go the way of the Sonoff Mini and not have any easy access headers for flashing the open source firmware of your choice.  The Sonoff S31 line of plugs easily fit two plugs on the same wall socket with ease, utilizes screws in case you want to open the device, and has easy to solder RX/TX pin headers; which is why the S31 is still my favorite smart plug! Of course I took the device apart and compared it to the previous non-UL S31 model (pics below).  I was excited to see they kept the same PCB that handles the ESP8266 side of things wh

The Extensive Smart Light Comparison of 2019

Image
The Extensive Smart Light Comparison of 2019 | Teardowns included at the End We spent quite a bit of time setting up 15+ bulbs, photographing, videoing them and testing out each channel with LUX sensors.  All the data and video has been compiled for you to make your own decisions, although I do tell you which bulb is my favorite based on various factors/features. Bulbs Lohas A19 60W RGBW Lohas A19 E26 CW/WW Lohas A21 100W RGBW Edison Tunable E26 CW/WW Novostella 120W A19 Reafoo E26 Anoop 60W CW/WW Aoycocr A19 750lm Enshine A19 60W Esicoo 60W Luntak E26 60W Merkury A21 75W Teckin SB50 Lifx A19 1100lm Google Spreadsheet of Smart Lights  -=-=-=-Get the Products We Use/Recommend-=-=-=- Amazon US - https://amzn.to/2YZNDeO Amazon UK - https://amzn.to/2TnG2R4 Amazon CA - https://amzn.to/2HchPZe -=-=-=-Come chat with us!-=-=-=- Discord - https://discord.gg/bNtTF2v Patreon - https://www.patreon.com/digiblurDIY Links to products provided th

Lohas RGBW Bulb Recovery via Serial USB

Image
First you may ask why do we need this if we can currently do these with Tuya Convert?  Pay attention to that word "currently".  You can never beat the tried and true method of connecting up those RX/TX lines via serial to flash your ESP82xx devices.  99.9% of the time it just works!  If you have any issues or firmware corruption it is stupid simple to just recover your device.  Luckily the quite awesome performance to cost ratio bulbs that Lohas provides they also have the RX/TX pins exposed for us right on top under the diffuser.  That's quite rare in a bulb, especially in one of my favorite bulbs!  The only issue I've found is the 3v3 pin does not work!  But no fear!  It is easy to solder to the 3v3 pin on the flash memory chip.  First apply a bit of flux to each pad you will be soldering to then apply a small bulb of solder to the pads.  Next take a dupont jumper wire and cut off the ends.  Apply a small amount of flux and then tin them with solder.  Then

Anatomy of an RGB Smart Switch - Teardown and Flash Tasmota

Image
Tearing down a unique RGB night light switch from top to bottom.  We show the investigative work of figuring out the pins for flashing and usage of the switch.   Join the fun and remove the cloud dependency from your switches making them yours! RGB Smart Switch Alternate Switch Volt Meter Dupont Jumpers CH340G Usb to Serial RGB Switch Tasmota Template {"NAME":"RGB Switch","GPIO":[30,255,32,10,39,38,0,0,31,9,37,21,255],"FLAG":0,"BASE":18} Addtl Links Tasmota - https://github.com/arendst/Sonoff-Tasmota NodeMCU Pyflasher - https://github.com/marcelstoer/nodemcu-pyflasher Devices/Toys we use - https://amzn.to/2YZNDeO Amazon UK Link - https://amzn.to/2TnG2R4 Amazon CA Link - https://amzn.to/2HchPZe Come chat with us! Discord - https://discord.gg/bNtTF2v Patreon - https://www.patreon.com/digiblurDIY

Reolink Argus Eco 1080p Solar Powered Camera Review

Image
Review of the Argus Eco - Wire Free Solar Powered Camera.  Put it Anywhere! Congrats to Mike S on his win of the giveaway on Discord/Facebook.  Be sure to read his review of the camera here -   Mike S's review of the Argus Eco (PDF file) Argus Eco(US) Argus Eco(UK) Direct Reolink Argus Eco Link Additional 8% off coupon code from Reolink - ytbreo8offustravis Devices/Toys we use Amazon UK Link Amazon CA Link Come chat with us! Discord Patreon

Updated digiDIM / WifiManager Tasmota Files

Image
For the folks using the awesome Martin Jerry SD-01 and Tessan / Acenx MJ-SD02 dimmers, I've updated the fork to 6.6.0.6.  There aren't any additional features except for what came with the rebase on the updated base of Tasmota.  If you do decided to update your dimmers you'll need to select the MJ-SD01 module again after the reboot since the module number changes with this version.  More info on setup/flashing to be found here . Even though Tuya Convert seems to be getting more rare and rare each day, I updated the generic bin with wifi manager (AP mode) as default to 6.6.0.7 as well, this can be used for many other flashing applications too!   Download here .

Power Monitoring with the ShellyEM

Image
The ShellyEM is an all in one power monitoring solution for monitoring two circuits up to 120A. Buy a ShellyEM Products I use and recommend Amazon UK Link Amazon CA Link Come chat with us! Discord - https://discord.gg/bNtTF2v Patreon - https://www.patreon.com/digiblurDIY Sample Home Assistant Sensor via MQTT   - platform: mqtt     name: "ShellyEM1 Watts"     state_topic: "shellies/shellyem-B9E17C/emeter/0/power"     qos: 0     unit_of_measurement : "W"     icon: mdi:flash-circle   - platform: mqtt     name: "ShellyEM1 Volts"     state_topic: "shellies/shellyem-B9E17C/emeter/0/voltage"     qos: 0     unit_of_measurement : "V"     icon: mdi:flash-circle #    availability_topic: "shellies/shellyem-B9E17C/online" #    payload_available: "Online" #    payload_not_available: "Offline"

Wyze $5 Door/Motion Wireless Sensors - No Cloud or Camera Required - How To with Home Assistant

Image
Easy to deploy and reliable sensors for automations on doors, cabinets, freezers, toilet seats (we know who!), etc, check out the Wyze Sense pack.  By popular demand after the live stream we are doing a quick and easy step by step setup with Home Assistant.  This was tested on a Raspberry Pi 4 (which runs pretty quick!) but you can install this on many device setup types, such as unRaid, docker, etc. Wyze Sense Pack w/ Camera Wyze Sense Pack Only Raspberry Pi 4 Kit Addtl Links Wyze Component - https://github.com/kevinvincent/ha-wyzesense HACS Install - https://custom-components.github.io/hacs/installation/manual/ DrZzs Install of HACS - https://www.youtube.com/watch?v=aJTTCAvzpIU Products I use and recommend on Amazon Come chat with us! Discord - https://discord.gg/bNtTF2v Patreon - https://www.patreon.com/digiblurDIY unRaid hidraw<x> Passthrough This is for folks running separate docker containers and not using the Hassio Supervisor Plug in the Waze USB

Tuya Convert - What's Next? | Solderless Flashing Options

Image
Tuya Convert got you down?  Still looking for some devices that don't require soldering to flash your Tasmota, ESPHome, etc open source firmware?  We are checking out a few devices that can be flashed with the open pin headers.  No soldering!  If you have any devices to add to the list be sure to comment down below.  They will get added along with pictures of the pin headers on this Blog post.  Let's build the list and make all of our devices ours with pure local control! Solderless Devices Zemismart - 1,2, or 3 Switch They refer to them as gangs, but there are three models based on how many switches you want. They are clickie style switches and fit in a standard US 1 gang width box.  Remove the 4 screws on the back and you'll see the pins all right there.  IO0 is the GPIO 0 pin. Sonoff iFan03 The button is GPIO0 - hold the button while applying power for a few seconds, just like the Sonoff Basic Etekcity Switch 2 Way Etekcity Switch 3 Way

ESPHome on the Etekcity NightLight plug and 2 & 6 Channel Power Monitoring

Image
Finishing up the last bit of sensors and config on the Etekcity power monitoring plug.  No soldering required to flash the plug as they left us an open header to attach to.  Snuck in a little bit of the cool 3 way Martin Jerry switch. Etekcity Plug Martin Jerry 3 way Switch 2 & 6 Channel Monitoring Boards with ESPHome - https://circuitsetup.us/ Audio issues on the first piece, but we reset OBS to fix the issue!  Sorry guys/gals! Tasmota Template for the Etekcity (had issues with voltage readings dropping at random times) {"NAME":"ETekNightLight","GPIO":[0,0,0,0,37,21,0,0,132,133,17,130,52],"FLAG":1,"BASE":45} Work in progress Etekcity Plug Config substitutions:   plug_name: etekpower   # Higher value gives lower watt readout   current_res: "0.00095"   # Lower value gives lower voltage readout   voltage_div: "2040" esphome:   name: ${plug_name}   platform: ESP8266   board: esp8285 wi
3 Way Smart Switch with Motion Activation

Image
Installing the true 3 Way Smart Switch from Etekcity.  As always we flash the switch with open source firmware, Tasmota for 100% local control.  No soldering required to flash!  After the setup we do a slight modification to add a motion sensor to solve an issue I had in our laundry room. Etekcity 3 Way (2 pack) Etekcity Single Pole Flashing FTDI USB Flasher Jumper Wires Straight Header Pins https://amzn.to/30EZsUK To Add Motion Activation AM312 Angled Header Pins Installation Tools Wago 221 Wire Connectors Circuit Tester Soldering gear I use Station Solder  Flux  Helping Hands Additional Links Tasmota NodeMCU Pyflasher 3 Way Switch Diagrams Cliff Quicktest Tasmota Template {"NAME":"Etekcity 3Way","GPIO":[255,255,0,255,23,29,0,0,82,22,10,0,0],"FLAG":0,"BASE":18} Setup Commands for the Console backlog switchtopic 0;switchmode1 1;switchmode2 5;switchmode3 1;powerretain 1;rule1 on event#ON do power

3 Way DIY Smart Dimming

Image
3-Way Dimming without the cloud! I show the hallway 3 way light that was in dire need of dimming at night from our motion activated lights.  All of the Tasmota rules and links to wiring diagrams are included below. Enjoy! Subscribe, give us a thumbs up, and feel free to comment if you have any questions. Acenx Dimmer Switch Zemismart Switch 3-Way Switch Diagrams How to Flash the Acenx/Martin Jerry Dimmer Amazon US Link Connect with Us Patreon - https://www.patreon.com/digiblurDIY Discord - https://discord.gg/bNtTF2v Primary Dimmer Rules Rule1 on Switch2#state=2 do Dimmer - endon on Switch3#state=2 do Dimmer + endon on Switch2#state=3 do Dimmer 30 endon on Switch3#state=3 do Dimmer 100 endon Rule2 on Power1#State=1 do backlog publish cmnd/SW_Hall_Secondary/ledpower 1; ledpower 0 endon on Power1#State=0 do backlog publish cmnd/SW_Hall_Secondary/ledpower 0; ledpower 1 endon Rule3 on Dimmer#State>=70 do Var1 15 endon on Dimmer#State<70 do Var1 85 endon on Sy

LOHAS Smart Bulbs and a cool white/warm white bulb configured with ESPHome and Tasmota

Image
The LOHAS LED Bulbs utilize dual channels of warm white and cool white LEDs on the MY9231/MY9291 LED drivers.  We show in ESPHome how to solve this issue with a custom component.  All of the sample configurations used in the video can be found at the GitHub link below.  The Anoop bulb is a dual channel PWM light shown in Tasmota.  We also show how to easily configure the device using the new copy and paste templates of Tasmota. LOHAS Color (3 pack) LOHAS Color (1 pack)  LOHAS CW/WW LED  Anoopsyche CW/WW LED Amazon US Link Connect with Us Patreon - https://www.patreon.com/digiblurDIY Discord - https://discord.gg/bNtTF2v LOHAS ESPHome Configurations and CopyChan component - https://github.com/digiblur/ESPHome_LOHAS_LED Home Assistant Sample MQTT Configurations - https://github.com/digiblur/Sonoff-Tasmota/wiki/Smart-Bulbs Tuya Convert Process - https://www.youtube.com/watch?v=O5GYh470m5k

DIY Smart Laundry - Electric Dryer Voice Notifications

Image
Do you use an electric dryer and need a solution to send voice notifications when the cycle is complete?  Let's build a simple non-invasive DIY sensor that monitors the electrical draw from the dryer using a Wemos D1/NodeMCU, a couple resistors, capacitor and a split core current transformer.  You can also apply this same project to many other electrical monitoring projects in the home.  Parts List Split Core Current Transformer Wemos D1 Mini   10µF Capacitor 10k Resistors   Preformed Jumpers Breadboard Alternative NodeMCU 8266   Alternative NodeMCU 8285 Amazon US Link Connect with Us Patreon - https://www.patreon.com/digiblurDIY Discord - https://discord.gg/bNtTF2v Misc Links Wiring Diagrams and Arduino Sketch - https://github.com/digiblur/digiDryerMon Arduino IDE Download - https://www.arduino.cc/en/Main/Software AsyncMQTT - https://github.com/marvinroger/async-mqtt-client ESPAsyncTCP - https://github.com/me-no-dev/ESPAsyncTCP Boards Manager Address f

Smart Bulbs with Tasmota & ESPHome - Home Assistant

Image
Renting or can't swap out your light switches with the various solutions we have shown?  Let's check out some smart lighting options. Lights Used Smart Bulb RGBW Smart Downlight RGBW - 4inch Smart Downlight RGBW - 6inch How to configure both ESPHome & Tasmota with 2 smart lighting options.  Both of these devices utilize the MY9291 LED Driver inside.  After using the easy Tuya Convert process to flash custom firmware we show how to configure each light in Home Assistant for MQTT/API Local Control without the cloud. Upcoming Lights: Set#1   and Set#2 Amazon US Link Tuya Convert Process - https://www.youtube.com/watch?v=O5GYh470m5k Tasmota Project - https://github.com/arendst/Sonoff-Tasmota ESPHome Project - https://esphome.io/index.html Sample Home Assistant Config: https://github.com/digiblur/Sonoff-Tasmota/wiki/Smart-Bulbs Tasmota Device Templates - https://blakadder.github.io/templates/

DIY ESPHome Multisensor - Temp, Humidity, RGB LED, Motion and LUX

Image
I built another multisensor for the bedroom and I decided to change up a few components.  Dive in and take a step by step approach to build it with Otto Winter's ESPHome software this time around as it's been a year since I built the initial Bruh Automation version.  ESPHome is easy to use and configure; No Arduino IDE, no coding, just a config file and the sensors wired up!  Parts List Used  NodeMCU TSL2561 LUX Sensor  or Sensor#2 Jumper Wires AM312 Motion Sensor 5mm Neopixel  or  8mm Neopixel DHT22 Temp/Humidity Sample ESPHome YAML (replace the IP address and WiFi information) esphomeyaml:   name: sensor_node1   platform: ESP8266   board: nodemcuv2 wifi:   ssid: 'yourWIFIhere'   password: 'yourPASShere'   manual_ip:     static_ip: 10.10.1.40  change this IP and remove this message     gateway: 10.10.1.1     subnet: 255.255.255.0     dns1: 10.10.1.1     dns2: 10.10.1.1     # Enable logging logger: # Enable Home Assistant API

Sonoff RF Bridge Easy Setup with Tasmota Rules and the trigBoard

Image
Easy setup of wireless sensors utilizing the Sonoff 433mhz RF Bridge.  Custom MQTT topics and automations with Tasmota rules all self contained in the bridge.  We also check out the trigBoard from Kevin Darrah with deep sleep modes and custom sensors all from a battery powered ESP8266 based board. Sonoff RF Bridge TrigBoard Amazon US Link How to Flash the RF Bridge with Tasmota: https://youtu.be/OfSbIFIJPuc?t=40 Wireless Sensors Door  Water Sample Home Assistant Sensor Configuration   - platform: mqtt     name: "Freezer Door"     state_topic: "RFBridge/sensor1"     availability_topic: "tele/RFBridge1/LWT"     qos: 1     payload_on: "Open"     payload_off: "Closed"     payload_available: "Online"     payload_not_available: "Offline"     device_class: door

Flash Tuya Smart Switches Over the Air - No soldering!

Image
You heard correctly, flash all of your SmartLife Tuya App devices with no soldering at all.  Flash them while you can before devices are updated.  All you need is a Raspberry Pi 3 to flash your devices with Tasmota.  No soldering at all and you will have full local control unlocking the true power of your smart devices. UPDATE: Be very careful that you put in the correct SSID and Password.  It might not be a bad idea to put in a simple backup SSID and Password in position 2.  If for some reason you mistype the slot 1 password you could always change your WiFi router to send out the simple SSID and password in slot 2 to fix the issue with slot 1.  Also once you get into the switch/plug Tasmota GUI, I would highly recommend changing the WiFi Config tool to WiFi Manager by typing "wificonfig 2" (without the quotes on the console), it should respond back with that WiFiManager is selected.  This will make the device go into access point mode anytime there is an issue with co

True 3-Way Smart Switch w/ Tasmota - No rewiring!

Image
It's here!  A smart switch that works in several different 3 way wiring configurations without any rewiring or other tricks.  Swapping out one of the 3 way switches with this one is the only requirement.  This video also shows the details of using with Tasmota for local MQTT control with Home Assistant. Purchase 3-Way Smart Switch Additional Parts for Flashing Tasmota if Needed Soldering Iron Station Helping Hands(as shown) Alternative Upgraded Helping Hands 0.015 Solder Female Jumper Wires USB FTDI for Flashing Amazon US Link Updated with templates for the new Tasmota version Setup your MQTT Configuration first Tasmota Setup Commands (copy and paste each section to one line in the Tasmota Console) Setup and Configuration Page Consolidated Here Additional Links Excellent guide with various 3 way wiring configurations Tasmota Releases Flash ESP8266 Termite Terminal App Internal Pictures

How to install unRaid NAS and Home Assistant

Image
Have you outgrown the Raspberry Pi with Home Assistant?  Need something easy with more space and horsepower?  Look no further as unRaid is an easy Network Attached Storage solution that works great with Home Assistant.  No command line experience needed!  The docker management GUI of unRaid is second to none with easy installs, automatic updates, notifications, and more. Spaceinvader One's channel for additional unRaid Tutorials How to install Community Applications on unRaid Form thread

Smart Motion Sensor and Night Light - How To

Image
How to make a Smart Motion Sensor out of a Night Light Smart Plug.  An excellent solution to easily put a motion sensor in a room where you couldn't before for automated lights. You also get a night light and smart plug in the same package for less than $20! Parts List Smart Plug - iMah or iClever  PIR Motion AM312 Sensor - 2 pack or 1 pack   Soldering Iron Station Helping Hands(as shown) Better Helping Hands 0.015 Solder Female Jumper Wires USB FTDI for Flashing (click the pic to zoom) Home Assistant Configuration YAML - Samples switch:   - platform: mqtt     name: "MotionNite Switch"     state_topic: "stat/MotionNite1/POWER1"     command_topic: "cmnd/MotionNite1/POWER1"     availability_topic: "tele/MotionNite1/LWT"     qos: 1     payload_on: "ON"     payload_off: "OFF"     payload_available: "Online"     payload_not_available: "Offline"