The Treatlife Esmlfe Tasmota Fan Controller
UPDATE 07/16/2020 - Video showing using the jig to flash this controller
I've done several projects with the Sonoff iFan03 and various Martin Jerry dimmers to make my own fan controllers that work via Home Assistant while also following my rule of "never removing functionality while adding functionality" in a smart home. The setup is challenging with replacing fan capacitors for 120vac based fans, dimmer rules, iFan rules, etc. I've always been looking for a drop in fan controller that was not Zwave or Zigbee based. Treatlife finally came out with a device that answers all of this and more!
The Treatlife/Esmlfe 2 in 1 Fan Controller and Light Dimmer is currently priced comparatively with other Zwave fan controllers that only have fan controls. Available on Amazon
A live stream is available showing the device - View Live Stream on digiblurDIY
The switch will work with the Tuya Smartlife cloud app if you want to ride dangerously but as of this article if you attempt to use it via the Home Assistant Tuya integration, the dimmer and fan control entities will not show up. So how do we control it? We flash it with Tasmota of course! Keep it all local control without the cloud! Unfortunately, at this time these devices are shipping with Tuya firmware that is blocking the current TuyaConvert exploit. The switch will need to be flashed via the old school manual method. Don't worry, this is fairly simple.

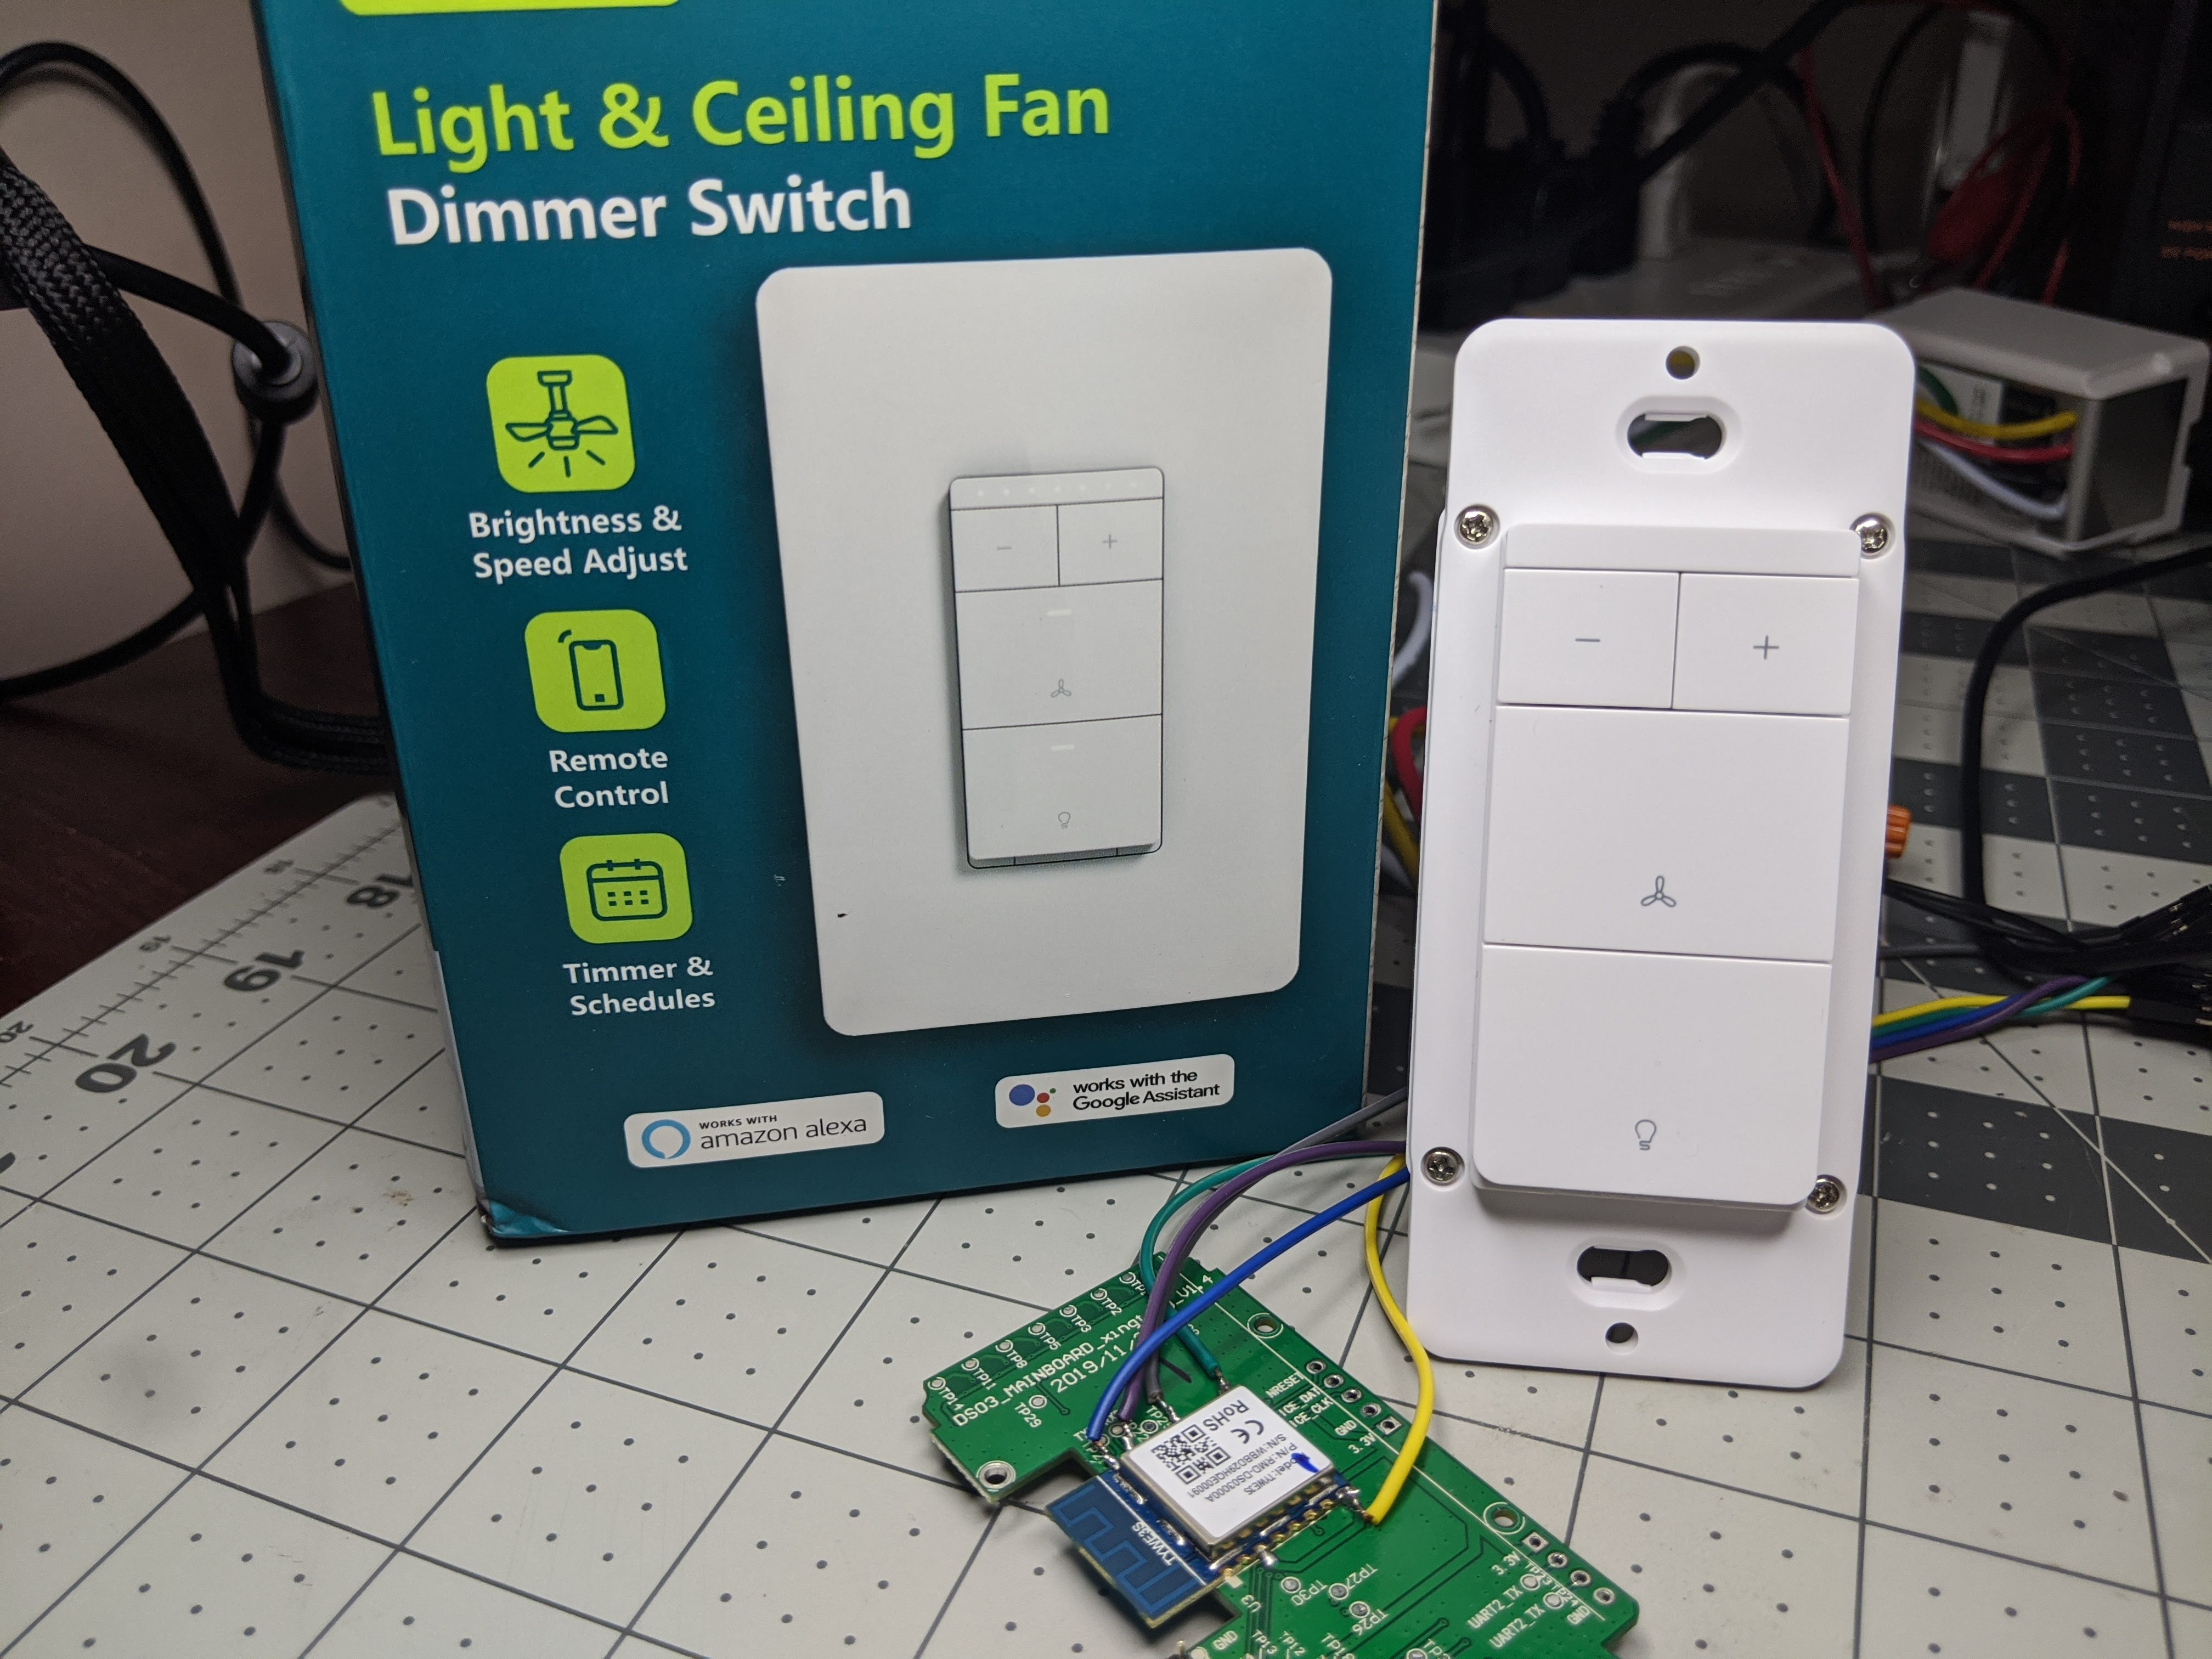
Disconnect any power going to the device! Remove the 4 screws and the face plate will come off. There are no ribbon cables or wires to worry about.

The TYWE3S module containing the flash-able ESP8266 chip is wide out in the open. There are multiple choices you can use to flash this chip with the 3v3 and GND headers. Using a TTL USB adapter, you need to connect the following wires: 3v3 (do not use 5 volts!), Ground, RX, and TX. GPIO 0 will also need to be attached to ground to enable flash mode on an ESP8266. Instead of soldering, if you have a 3D printer you can also make a pogo pin jig as shown here and below. Remember that RX goes TX and TX goes to RX on the USB TTL adapter.


Also, note you will need to put a jumper between NRESET and GND locations. This keeps the secondary TuyaMCU in a reset loop during the flashing of Tasmota. Without this jumper the flashing process will not work.


Once you've connected the necessary wires to your USB TTL device you can utilize Tasmotizer to flash the chip. Additional information available on flashing Tuya devices can be found here in the Tasmota Wiki
Once flashed, disconnect GPIO 0 so it will boot up into Tasmota. You need to scan the WiFi access points with a phone, laptop, or tablet. You should see a tasmota-xxxx or similar named WiFi access point. Connect to this AP, accept any messages about no internet connectivity if your device prompts you, this is normal. Browse to 192.168.4.1 if it does not open the Tasmota page automatically. Click scan, select your home WiFi network and enter the password for your network. Check the box show password to make sure you have the password correct. Save the settings. The Fan controller should now be on your network. You can look on your router or WiFi attached devices and find the IP address of the device. Browse to this IP address to complete the rest of the Tasmota setup.
It's all down hill after this... click the Console button on the Tasmota GUI of the fan switch. Issue the following commands. Take note it will restart during many of the commands, wait for the console to somewhat settle down before issuing the next one.
module 54
backlog so97 1 ; tuyamcu 11,1 ; tuyamcu 12,9 ; tuyamcu 21,10
backlog ledtable 0 ; dimmerrange 10,1000 ; so59 1 ; so68 0
There is a configuration choice to decide; by default the fan speed can be changed while the fan is off and it will not turn on. This can be a good or bad thing depending on your choices. Pick the Rule Set you like (you can change it later by simply copy and pasting the rule back into the console)
Add the following rule, this should be all on ONE line in the Tasmota Console on the Switch.
(SELECT ONE)
OPTION A: Does NOT turn the fan on when the speed/preset is changed:
Rule1 on TuyaReceived#Data=55AA03070005030400010016 do publish2 stat/%topic%/speed 3,0 endon
on TuyaReceived#Data=55AA03070005030400010117 do publish2 stat/%topic%/speed 3,1 endon
on TuyaReceived#Data=55AA03070005030400010218 do publish2 stat/%topic%/speed 3,2 endon
on TuyaReceived#Data=55AA03070005030400010319 do publish2 stat/%topic%/speed 3,3 endon
OPTION B: The fan turns on when the speed/preset is changed:
Rule1 on TuyaReceived#Data=55AA03070005030400010016 do backlog power1 1 ; publish2 stat/%topic%/speed 3,0 endon on TuyaReceived#Data=55AA03070005030400010117 do backlog power1 1 ; publish2 stat/%topic%/speed 3,1 endon on TuyaReceived#Data=55AA03070005030400010218 do backlog power1 1 ; publish2 stat/%topic%/speed 3,2 endon on TuyaReceived#Data=55AA03070005030400010319 do backlog power1 1 ; publish2 stat/%topic%/speed 3,3 endon
Enable the rule with the following
Rule1 1

You can then add the necessary MQTT configuration, device name, etc and it should be safe to disconnect the wires, reassemble the switch and install it on the wall, on mains AC power to the fan. You might be asking at this point "how do I control the fan speed from the GUI?" You will need to utilize the following commands to send the fan speeds on the console
TuyaSend4 3,0 (fan speed 1)
TuyaSend4 3,1 (fan speed 2)
TuyaSend4 3,2 (fan speed 3)
TuyaSend4 3,3 (fan speed 4)
You can also send those over MQTT if you like from various automations using cmnd/topic/tuyasend4 with a payload of 3,0 , etc.
Home Assistant Configuration
If you already have a "fan" and "light" section do not duplicate these sections in your Configuration YAML file. Don't forget to change the "yourtopic" topic to the MQTT topic configured in your fan switch MQTT page of Tasmota from the previous steps
As of 2021.4 Home Assistant MQTT Fan has changed (thanks to @merdely for the help):
fan:
- platform: mqtt
name: "Your Fan"
qos: 1
state_topic: "stat/yourtopic/POWER1"
command_topic: "cmnd/yourtopic/POWER1"
availability_topic: "tele/yourtopic/LWT"
percentage_state_topic: "stat/yourtopic/speed"
percentage_value_template: '{{ ((value | replace("3,","")) | int + 1) * 25 }}'
percentage_command_topic: "cmnd/yourtopic/tuyasend4"
percentage_command_template: "3,{{ ((value | int - 1) / 25) | int }}"
preset_mode_state_topic: "stat/yourtopic/speed"
preset_mode_value_template: '{{ value | replace("3,0", "turtle") | replace("3,1", "low") | replace("3,2", "medium") | replace("3,3", "high") }}'
preset_mode_command_topic: "cmnd/yourtopic/tuyasend4"
preset_mode_command_template: '{{ value | replace("turtle", "3,0") | replace("low", "3,1") | replace("medium", "3,2") | replace("high", "3,3") }}'
preset_modes:
- "turtle"
- "low"
- "medium"
- "high"
payload_available: "Online"
payload_not_available: "Offline"
payload_on: "ON"
payload_off: "OFF"
light:
- platform: mqtt
name: "Your Light"
state_topic: "tele/yourtopic/STATE"
state_value_template: "{{ value_json.POWER2 }}"
command_topic: "cmnd/yourtopic/POWER2"
availability_topic: "tele/yourtopic/LWT"
brightness_state_topic: "tele/yourtopic/STATE"
brightness_command_topic: "cmnd/yourtopic/Dimmer"
brightness_scale: 100
brightness_value_template: "{{ value_json.Dimmer }}"
payload_on: "ON"
payload_off: "OFF"
payload_available: "Online"
payload_not_available: "Offline"
Old Configuration for HA 2021.3 and earlier kept for documentation purposes
fan:
- platform: mqtt
name: "Bedroom Fan"
state_topic: "stat/treatfan/POWER1"
command_topic: "cmnd/treatfan/POWER1"
speed_state_topic: "stat/treatfan/speed"
speed_command_topic: "cmnd/treatfan/tuyasend4"
availability_topic: "tele/treatfan/LWT"
payload_available: "Online"
payload_not_available: "Offline"
payload_on: "ON"
payload_off: "OFF"
payload_low_speed: "3,1"
payload_medium_speed: "3,2"
payload_high_speed: "3,3"
speeds:
- low
- medium
- high
light:
- platform: mqtt
name: "Bedroom Light"
state_topic: "tele/treatfan/STATE"
state_value_template: "{{ value_json.POWER2 }}"
command_topic: "cmnd/treatfan/POWER2"
availability_topic: "tele/treatfan/LWT"
brightness_state_topic: "tele/treatfan/STATE"
brightness_command_topic: "cmnd/treatfan/Dimmer"
brightness_scale: 100
brightness_value_template: "{{ value_json.Dimmer }}"
payload_on: "ON"
payload_off: "OFF"
payload_available: "Online"
payload_not_available: "Offline"

That's it! Enjoy! If you need help feel free to pop into Discord and ask for a hand.
Discord - https://discord.gg/bNtTF2v
Patreon - https://www.patreon.com/digiblurDIY
YouTube Channel - https://www.youtube.com/digiblurDIY
Links to products provided through the Amazon Affiliate program.
I already have iFan03 in my ceiling fan, but never liked their remote control. Can I use this just as the switch on the wall that turns the fan/light on/off?
ReplyDeleteYep, that is the design of it.
DeleteThank you for sharing this! I wish I knew how to decode the different commands you shared to know what they're doing. How could I go about converting this info into a template like https://templates.blakadder.com/treatlife_SS01.html?
ReplyDeleteNo template needed for a TuyaMCU based switch. Just go to Configure Module then pick TuyaMCU. That's what the Module 54 command does.
DeleteAny idea why home assistant Tuya integration doesn't pick it up natively?
ReplyDeleteFrom what I've heard a few times their API server isn't really supported anymore, like how RGB bulbs don't have color wheels on them. It really wouldn't surprise me if one day it all just stopped working. https://github.com/PaulAnnekov/tuyaha/issues/17
DeleteOff the Tasmota github page. "The Tasmota development codebase is checked every 1-2 hours for changes. If new commits have been merged and they compile successfuly, new binary files for every variant will be posted at http://thehackbox.org/tasmota/ (this web address can be used for OTA updates too). "
ReplyDeleteI could not get the FW to update either at first. What I ended up doing was downloading tasmota.bin.gz and tasmota-minimal.bin.gz (make sure to use the .gz packed mapfile) to my computer from http://thehackbox.org/tasmota/ and then uploading them via the web interface. I had to upload the minimal binary first, then when that upgrade was complete I was able to upload the main binary. I did some reading and it seems to be related to binary size. Not sure why the method mentioned in this write-up works for some but not others.
ReplyDeleteGreat job on the sleuthing. It is supposed to flash minimal for you via OTA and then flash the full bin all automatically with the OTA upgrade option.
ReplyDeleteOf course you can use the manual method. And just to document this anyone else reading, only flash the minimal version if the device is on your network with Tasmota already.
If you are doing manual upgrades and get the buffer miscompare error which means not enough space. What I do is download the tasmota-lite.gz file. Flash that one. Then download the gz of the next one I need and it's just a little bit safer. Why? tasmota-lite contains the access point mode if something goes really weird in the middle. The minimal bin does not have access point mode.
This worked GREAT. About 1 hour after I had the Jigs in hand, I had my TreatLife Fan control / dimmer on Tasmota and had it connected to Home Assistant.
ReplyDeleteI had to gently rock the jig the first time to get it to connect, then it remained solid. My first flash was tasmota-lite. I could not upgrade within Tasmota to the full version (memory error) but then flashed from Tasmotizer again to full tasmota version 8.3.1.7.
Nice work! Tasmota should automatically handle the OTA 2 step flash to the development version. But yes, if you are using the manual BIN upload it's not a bad idea to send over lite first then the full tasmota.bin of the development version. With 8.3.x you can also use the .gz files too. I had an issue with Tasmotizer crashing if I tried to send the development build over first so I tried to keep it simple and all GUI for folks as much as possible.
DeleteFollower all the steps in your procedure and after the manual flash the chip is stuck in a bootloop. See the log below.
ReplyDeleteI flashed it with tasmota 8.4 .bin file .
https://github.com/arendst/Tasmota/releases/download/v8.4.0/tasmota.bin
-------------- CUT HERE FOR EXCEPTION DECODER ---------------
ets Jan 8 2013,rst cause:2, boot mode:(3,7)
load 0x4010f000, len 3456, room 16
tail 0
chksum 0x84
csum 0x84
v0cc1cc0b
~ld
--------------- CUT HERE FOR EXCEPTION DECODER ---------------
Exception (0):
epc1=0x4026de40 epc2=0x00000000 epc3=0x00000000 excvaddr=0x00000000 depc=0x00000000
>>>stack>>>
ctx: sys
sp: 3fffe5b0 end: 3fffffb0 offset: 0190
3fffe740: 40105cec 40105ce9 00000000 00000000
3fffe750: 400005e1 00000000 00000000 00000000
3fffe760: 4026de40 00000033 00000020 00000000
3fffe770: 40105cf2 04000102 00000000 00000001
3fffe780: fbf8ffff 04000002 3feffe00 00000100
3fffe790: 0000001e 00000018 04000102 40105cd4
3fffe7a0: 3fffc100 3ffeed40 00000000 00000000
The lite and minimal also give out the same error.
DeleteI have tried the erase flash option using tasmotizer-1.1a but the same error log comes up.
How are you powering and receiving this log? I have had this issue on other chips where the power supply wasn't enough to boot Tasmota via the USB flasher. Have you tried letting it boot via the mains unit itself with no wires connected?
DeleteI am powering up via TTL USB adapter. Its getting 3.3V from the USB adapter. I have connected Teraterm and getting this log when the switch boots up. I don't think I can get the log with the main's connected.
DeleteIf i download the .gz file and extract the tasmota.bin file from it will it make any difference compared to downloading the tasmota.bin directly from web?
Is there a way to force the .gz file on to the chip instead of the .bin file?
@digiblurDIY you were correct. After I flashed with Tasmota lite and power up via mains everything seems to be working. Thanks For your help :)
DeleteAwesome! And I do hope you upgraded off of lite to the regular bin. I don't recall if Lite supports TuyaMCU or not.
DeleteFollowed your instructions and they worked perfectly. Thank you for putting this together!
ReplyDeleteThis comment has been removed by the author.
ReplyDeleteHallo. I am struggling with wemos. I'm sending a signal from wemos 1 to wemos 2. wemos 2 turns on relay 1 and no 2. I guess it's the fault of the wifi. I have another question if it is possible to communicate with tasmota to tasmota without a router. If the routar network disappears, is it possible to connect to tasmota 1 and 2. Is it possible to send to several tasmota without a router, turn off the light. thank you.
ReplyDeleteHow could I use this switch to control 2 lights? a dimmable one and a regular one?
ReplyDeleteAny advice greatly appreaciated.
Struggling to get Tasmota on. I have soldered the wires onto the chip as you show, and connected everything to a USB serial adapter. When I use Tasmotizer, it says 'Failed to connect to ESP8266: Timed out waiting for packet header'. I know the module is getting power because it lights up, but I'm not sure what else to check. This is my first time trying to flash something with Tasmota, so I'm sure I'm missing something, just not sure what to check. Thanks so much for your help.
ReplyDeleteHave the reset held to ground?
DeleteAfter getting this error multiple times I figured out that if the switch was on it would fail the usb port causing a disconnect. Finally got them flashed by ensuring that there were no green lights lighting up when connecting the power.
DeleteI want to use this switch with my Ifan03. My fan has light and there is only one wire going to the fan from my switchboard.I think the old switch controlled the fan and light via RS433. I will like to use the switch just as a wifi switch that sends the commands to Ifan03 to toggle light and fan on/off with three fan speeds.
ReplyDeleteI am not sure about the commands that I need to setup on both switch and the Ifan03. I am also using home assistant to control my other devices.
Currently both Ifan03 and the switch are added to HA as MQTT devices.
Kind of want the setup you showed with Martin Jerry dimmer and Ifan03.
Just one switch instead of two seprate switches.
Can you help me out with the commands/rules to make it work?
How do you get the feedback from the physical dimmer when it is pressed? It doesn't appear to be in the commands you listed.
ReplyDeleteThe TuyaMCU should send it over and Tasmota processes it as dimmer states. That is in the setup above.
DeleteIt's odd. It isn't updating Tasmota dimmer side when the physical + and - buttons are pressed. Weblog 4 shows the TuyaReceived when they are pressed. Not sure why Tasmota doesn't update despite the TuyaMCU 21,10 command. I ran so66 1 and am getting it via the TuyaReceived catch all tele/topic/RESULT in the meantime. Controlling from GUI works fine and shows correct status but just not when physical + and - buttons are pressed. Everything else seems to be working fine. Dimmer range from using the weblog 4 though should be 100 to 1000 which is my only change to the instructions. Thanks for the tutorial!
DeleteHi Artekus,
DeleteI ran into the same issue as you with the physical buttons not updating tasmota. Please check rule 1 to ensure you replaced "%topic%" with your actual topic name. Once I did that it resolved the issue.
I'm having a similar problem.
DeleteI can...
- control of everything from the Tasmota/HA side to control fan & light
- update the fan and light relays and the fan setting from Tasmota or HA when using switch buttons
I can't...
- get the dimmer buttons to push the dimmer state back to Tasmota/HA.
Any ideas?
is it showing in the console of Tasmota itself?
DeleteYes... see all values updating correctly in Tasmota console when using buttons but not tasmota or HA sliders. Also tried toggling power instead of dimmer level. See relay/power change but slider value doesnt refresh.
DeleteTry updating to the latest 9.x version of Tasmota. I saw someone else with the same issue on 8.5.1 or something like that.
DeleteUpdated to 9.0.0.3 and issue is corrected with status display in HA but status doesnt change on Tasmota interface. Thanks!
DeleteIf it is updating HA then it should be updating the Tasmota console.
DeleteFirst off thank you for the tutorial and the jig. I got the unit flashed with Tasmota 8.5.1. I'm running into so issues with getting the unit in Home assistant. I manually added the device using the config.yaml file after enabling MQTT on Hass.io and configuring the username and password. However when I go to view the two new objects fan.master_bedroom_fan and light.master_bedroom_light under entity in the UI I get the following error.
ReplyDeleteThis entity does not have a unique ID, therefore its settings cannot be managed from the UI. See the documentation for more detail.
My question is how do I control the switch objects from HomeAssistant
You should be able to just click them and control them, turn them off, set the speed, set the dimming level etc. That error is normal for entries put into YAML manually as you aren't using the GUI to configure the name and such.
DeleteWhen you see
This entity does not have a unique ID, therefore its settings cannot be managed from the UI
Text
this simply means that you can’t change the entity_id or the friendly name from the UI. You can still use the Customizations menu to customize that entity. Typically you’ll see this when you create entities using YAML.
Thank you, so i just testing both objects by using the Homeassistant services and am able to turn on and off the fan and light. Along with setting the speed and brightness. However when I manually push the buttons on the lightswitch it does not update in homeassistant. Yet when I do it from the tasmota webui it does update in homeassistant.
DeleteAnythoughts on why this is?
Nevermind, it must be late my brain wasnt functioning correctly. I just blindly copied rule1 instead of modifying it to replace "%topic%" with my actual topic name. I have a feeling this is the same issue as the person above me.
DeleteTasmota replaces the topic variable with the topic of the switch automatically.
DeleteIn my case it did not. When pressing the physical button I was not seeing any feedback in the console or in home assistant. After updating rule one as noted before everything is now working correctly.
DeleteThere must have been some other issue with the rule as I use the topic variable all the time. Great feature as it allows copying the same rule to multiple devices.
DeleteI just tried to OTA Tuya-convert my treat life SS01 3-way switches but found that it wouldn't work due to the new firmware. So I am trying to flash via hard wire. I opened up the switch and found the TYWE3S but am concerned about he soldered pins that don't match up to what I have seen. Is there any way to send you a pic of my board to show you what I am seeing? Thanks for all of the good info and videos.
ReplyDeletePretty standard chip there. I even use one in this example video of no soldering method. https://youtu.be/imKZbhJ8lvU You can always email me at the channel name on the gmail domain or hit me up on the discord chat links on the videos.
DeleteTHANK YOU! That is so awesome - just what I was looking for. I guess I was confused as on that switch, it looks as if the tx and rx pins weren't soldered to the board. I am going to order up those things and flash them over.
DeleteI might have missed it in the video. I have mine flashed but my house was designed with a separate wall switch for the light. Do I just tie them in to the new switch and remove the wall light switch.
DeleteI put another switch there myself that isn't feeding anything. The output is capped off. Then I used it for device groups tied to a lamp, various double press/triple press options etc for firing off automations, etc.
DeleteI got 6 of them flashed and working. THANK YOU SO MUCH!
ReplyDeleteI am getting a yaml error though.
This is my yaml
####################################################
# Office Fan 192.168.20.63 LIGHT #
####################################################
- platform: mqtt
name: "Office Fan Light"
state_topic: "stat/office_fan/RESULT"
value_template: "{{ value_json.POWER2 }}"
command_topic: "cmnd/office_fan/POWER2"
availability_topic: "tele/office_fan/LWT"
brightness_state_topic: "stat/office_fan/RESULT"
brightness_command_topic: "cmnd/office_fan/Dimmer"
brightness_scale: 100
brightness_value_template: "{{ value_json.Dimmer }}"
payload_on: "ON"
payload_off: "OFF"
payload_available: "Online"
payload_not_available: "Offline"
On this line
value_template: "{{ value_json.POWER2 }}"
I get an error on all 6 devices in VSC saying Property value tmplate not allowed.
Is this something to be "ignored" or is there some recourse I need to take.
Thanks
Looking at the docs maybe they want it as state_value_template now but support the old way... For now.
DeleteI've been looking for a cost-effective smart fan/light switch for a while and the Treatlife Fan/Dimmer switch appeared to tick all the boxes. I initially installed 3 of these on ceiling fans in our house, but I soon discovered some very odd behaviour under certain circumstances.
ReplyDeleteMost of my other switches in my house are already smart wifi switches. Some are straight on/off switches, others are dimmers. All require a neutral for proper functionality. I've noticed that when the Treatlife fan/dimmer switch is installed on a circuit that already has a smart dimmer switch, turning on the other dimmer switch would ALSO turn on the fan light. As you turn up the brightness on the other dimmer, the fan light brightness would turn down. My 9-year old thought his fan was possessed by ghosts when his bedroom fan light turned on in the middle of the night when we turned on the hall lights (on a smart dimmer) at various points in the night.
After much troubleshooting (and frying one of the 3 Treatlife switches) and online research, I found the problem. Old dimmers used to make incandescent lights dim by adding resistance at the switch, which would make the switch warm. That approach doesn't work with LED lights, so they now essentially dump unused voltage to the neutral wire. When you turn the brightness down, more voltage is dumped to neutral. The Treatlife switch is passing this voltage through to the light, which explains why turning up the brightness on one light would turn down the brightness on the Treatlife. This doesn't happen with any other dimmer, including the smart dimmers that were on these same circuits.
Has anyone else seen this behaviour? Out of the 3 Treatlife fan/light switches I bought, only one is on a circuit without another smart dimmer and works as expected.
I actually contacted Treatlife about this. They admitted that they don't support multiple smart dimmers on the same circuit because of this issue. For anybody else considering purchasing this dimmer (or any other Treatlife dimmer), make sure there won't be any other smart dimmers on the same circuit or you'll run into issues.
DeleteI have multiple fan/light combo switches on the same circuit without any issues. I also had some of their slide touch dimmers on the same circuit and had issues. I swapped out the bulbs and found some that work. Had to do this in multiple spots. Fans have some good Phillips LED bulbs so maybe they would have issues with other bulbs. Not sure.
DeleteAlso have some LED 4' shop style dimmable lights that have this issue with the Treatlife switches. I ended up using some MJ dimmers (MJ-SD02). Ugly in my opinion but they worked fine with 3 on the same circuit.
Just got one of these and I'm pretty excited about it... I've got some weird behaviour though.
ReplyDeleteI've got an ifan03 and the treatlife controller in a devgroup (I also tried grouptopic). The Power functions work for the light and the fan, but the fan levels aren't working from the switch. I can see the messages being published from the switch, but the ifan03 doesn't seem to be doing anything with them. I've tried a couple of variations of the rules you wrote for topic, speed/fanspeed, cmnd/stat etc.
Also, if I toggle on fan level 3 on the ifan web gui it turns the switch off.
Note: I did have to switch the relay configuraiton around from your guide here to have them match up with the iFan. I'm also not using Home Assistant. Hoping to just use the existing device communication.
Any ideas?
For fan speeds you'd need to do rules as the speed isn't known to Tasmota at this time to go through device groups.
DeleteThanks! I really appreciate your reply!
DeleteThis is where I'm confused though. I have the rules set at least on the switch side for setting fanspeed and the logs show those messages going to the ifan03. I've tried a bunch of different syntaxes and examples to try and model those on.
I can see that there is communication between devices even without the rules because the power state stays in sync and I can trigger actions if the fan switch is off and I trigger fanspeed 1 or 2 in the ifan webgui, the switch responds, although only with the lowest fan level.
I've tried to packet trace the wifi comms but I haven't figured out how to decode the mqtt yet. It looks like only a numeric value in the payload with the exception of this ASCII text - TASMOTA_DGR. I've also tried changing the tuyamcu device type to a fan controller (fnID 61), which would seem to make sense, although I'm a little over my head in that space. I'm stumped...
I would do the power states between the two and push cmnd/xxxx/xxx topics to the iFan. And use the rules like I did to get the fan speeds and push the speeds via mqtt as well.
DeleteJust in case this is helpful to anyone...
DeleteAfter a bunch of reading, trial and error, I've got a *mostly* working set-up with the TreatLife Fan Controller and an iFan03. Poking around I found that the fan controller was on dpID 103. I didn't need the light dimming functionality with my fan, so I zeroe'd out the dimmer config and added the Fan controller. base configuration commands looked like this:
backlog so97 1 TuyaMCU 12,1 TuyaMCU 11,9 TuyaMCU 61,103 - Note that my relays were opposite of Digiblur's here
I configured: devgroupname , so85 1, and devgroupshare 1,1 (although this last one probably isn't strictly necessary)
I also have the following rules on the switch:
For Soft buttons on the webgui:
Rule1 on TuyaReceived#Data=55AA0307000867020004000000007E do websend [iFan03-IP] FanSpeed 1 endon on TuyaReceived#Data=55AA0307000867020004000000017F do websend [iFan03-IP] FanSpeed 2 endon on TuyaReceived#Data=55AA03070008670200040000000280 do websend [iFan03-IP] FanSpeed 3 endon
For Hardware buttons on switch:
Rule2 on TuyaReceived#Data=55AA03070005030400010016 do websend [iFan03-IP] FanSpeed 0 endon on TuyaReceived#Data=55AA03070005030400010117 do websend [iFan03-IP] Fanspeed 1 endon on TuyaReceived#Data=55AA03070005030400010218 do websend [iFan03-IP] fanspeed 2 endon on TuyaReceived#Data=55AA03070005030400010319 do websend [iFan03-IP] fanspeed 3 endon
On the iFan03 to update fan controller state:
Rule1 on fanspeed#data=0 do websend [switchIP] Power2 0 endon on fanspeed#data=1 do websend [switchIP] TuyaSend2 103%2c0 endon on fanspeed#data=2 do websend [switchIP] TuyaSend2 103%2c1 endon on fanspeed#data=3 do websend [switchIP] TuyaSend2 103%2c2 endon
Note: I am seeing some spurious Power change updates for the lights with webgui fan controller button pushes, and fan speed changes are making power updates to the swich as well, but overall it's been pretty good.
what infill density do i use for 3d printing the jig. I used 80%. the pogo pins with 1 x 18.5mm / 0.039" x 0.728"(D*L) these dimension does not fit in. The pins are too big to go int he hole.
ReplyDeletethe pogo pins worked fine when i used the infill density at 22%.
DeleteHas anyone had an issue with this where the mqtt message is SOMETIMES delayed 10+ seconds from leaving the switch? Most of the times if I hit the physical switch button the MQTT message is send and the fan/light turns on. However sometimes if I hit the button, the tasmota console does not update for 10+ seconds THEN it will send the message and the light will turn on.
ReplyDeleteDoes this fit under a regular decora plate? I need to put it in a gang box of other switches
ReplyDeleteYep, decora standard screw holes and size.
DeleteAwesome guide and yes this is the switch I've been looking for forever. That said, I have a slight issue with the fan control in Google home.
ReplyDeleteI followed the guide, but I ended up straying when I got to the setup on the light part as I'm using tasmota(beta) in home assistant. The light switch/dimming and switch for fan on/off comes through there perfectly. But in order to control the fan, I had to use the mqtt setup in the configuration.yaml. When the fan from the configuration.yaml gets presented to Google home, it always shows as on. I can click it off then back in and it turns on the fan, but seems weird that Google home thinks it is always on. Any clue why that is?
Does it work in the HA GUI? I haven't strayed since the enum stuff isn't supported yet via the integration that I know of.
DeleteYep, the light works perfectly in the gui. With dimming. The fan can be triggered as a switch from the tasmota (beta) but not speed. I use the fan control from the mqtt configuration.yaml and it works fine. If I control the switch for the fan from Google home through the tasmota (beta) integration, everything is good. But there is no fan speed control there.
DeleteYep, needs that enum support first, you'll have to use YAML. Then the other issue is HA only supports 3 speeds.
DeleteThis worked great. But when I turn on the "high" speed "3.3" the real fan speed becomes less than "low" speed "3.1".
ReplyDeleteAny ideas?
That is fully bypassed meaning nothing on the switch is changing the speed. Does it show as high on the switch itself?
DeleteThen it could be a hardware failure or some weird incompatibility issue as when you are using the faceplate buttons you are not interacting with Tasmota at all.
DeleteBought 10 of these switches for a project, just followed the guide, installed Tasmota 9.2 and while I can get the Tasmota GUI and Home Assistant to agree, none of the physical buttons will update the GUI or Home Assistant. However, with Rule1 enabled for the fan, I do see updates for the fa speed adjustments in MQTT on Home Assistant. I realize the GUI doesn't always update, and I really don't need the GUI to be correct in tasmota, but I do need MQTT and the physical button states to agree. Maybe this is an issue with Tasmota 9.2, and I need to go back to 9.1? I can see Tyua commands being generated in the console on button presses, just no updates for the light.
ReplyDeleteI checked one with 9.2.0.1 on it and pressed the buttons and I can see the state changes of the dimmer and light. Try to update to the latest developer version and see what happens.
Deletehi Jason, thank you for the video. I flashed it and got tasmota on it. I hooked everything to the wall switch and got power and able to use it manually. I was able to find the it's new wifi and go online. However, when in configuration it doesn't seem like any changes i made applies to the switch. example: on/off doesn't work along with everything else.
ReplyDeleteI did noticed when i unsolder the GPIO wire that it took the solder with it. I'm wondering if i need to take it apart and resolder the GPIO. Any thoughts? Thank you once again
You might want to try jumping into discord https://discord.digiblur.com and see if we can work through this with pics/etc.
DeleteJust a heads up. It looks like the most recent betas of home assistant now have support for fan speed by percent. https://github.com/home-assistant/core/pull/45407/commits/28bc38a3bada4601df20855aa6aa24df7d686156
ReplyDelete@digibluDIY, do you know how to implement this on a %scale so HA sees it as a dimmer?
ReplyDeleteAlso, any idea how to force the fan on without setting it to on when selecting a speed while off.
ReplyDeleteI have tried so20 and so54 but neither of them change anything. I'm assuming a rule might work?
I know in HA when you change the speed it toggles it to on. Using something else?
DeleteIm using HA. version 2021.3.2. maybe the issue is my fan template?
Deletehere it is
- platform: mqtt
name: "TreatLife Fan"
unique_id: tasmota_1E8386
state_topic: "stat/tasmota_1E8386/POWER1"
command_topic: "cmnd/tasmota_1E8386/POWER1"
speed_state_topic: "stat/tasmota_1E8386/speed"
speed_command_topic: "cmnd/tasmota_1E8386/tuyasend4"
availability_topic: "tele/tasmota_1E8386/LWT"
payload_available: "Online"
payload_not_available: "Offline"
payload_on: "ON"
payload_off: "OFF"
payload_low_speed: "3,1"
payload_medium_speed: "3,2"
payload_high_speed: "3,3"
speeds:
- low
- medium
- high
I think the problem is that with the new %scale, the speed OFF technically does not exist, so it does not know to turn it on. I also tried updating to 9.3.1
DeleteGood news. I have the fan working with a dimmer slider presented to HA by tasmota. The device now has 2 dimmers, fully autodetected by HA as 2 dimmable lights, all configured via rules in tasmota. nothing needs to be done in HA except change the light icon to a fan icon, (nothing needed in config.yaml at all if you have the tasmota plugin). the status changes track both ways and all 4 speeds are used at 25/50/75/100%. best of all because of the way the rules are, if you stop the slider below one of those values it will bounce up to that value after you let go. The initial setup is slightly different as when you have 2 dimmers they present as Channel1 and Channel2 not Dimmer, what was previously Dimmer is now Channel2 as Channel1 belongs to the fan so on/off can track properly. If anyone is interested I will share the initial setup and rules.
ReplyDeleteI would be happy to change mine to this method. Can you help with the steps coming from if we already have the previous method setup to this method? Will the rule we add just overwrite the previous info or is there any additional steps?
Deleteyes, the rule will just overwrite. Also, while I could have put everything into 1 rule, I did 3 separate rules as they handle 3 different kind of tasks and it just helped me keeps my thoughts straight. you can combine them into 1 rule if you want. Basically rule 1 is telemetry and pretty much as is from here, rule 2 is setting the dimmer scale based on the same received commands in rule1, rule 3 does the opposite and sets the fan speeds based on dimmer scale, this rule must be processed in order as written from largest to smallest in order to work. Last but not least the initial backlog commands need a slight change, as I outlined you need 2 dimmers so s068 is now 1 and not 0, as well the dimmer changes names and switches positions as the power and dim must be in matching pairs to work properly and turn on the correct power if off. so what used to be dimmer is now Channel2 to go with toggle 2 and the "fan dimmer" is Channel1 to go with toggle 1. the initial backlog is 3 lines the first is just the module which can be skipped if you are already setup but the next 2 lines should be run and will replace what you have. I will post it in just a few minutes, I'm making it look nice and organized. it works fine for me, but make sure you take a backup first just in case.
DeleteBelow is what you will need
DeleteAs a reminder, backup your tasmota config of that switch first just in case
I have just re-applied all settings to my swith just to make sure and its working great
** Rule1 is really no longer needed, but I like to populate the info into MQTT anyways **
** You could set the output to anything you want **
** Like Slow/Low/Medium/High instead of 3,0/3,1/3,2/3,3 **
**** To be noted, this is possible due to help I got on tasmota discord channel from vic and sfromis ****
module 54
backlog so97 1 ; tuyamcu 11,1 ; tuyamcu 12,9 ; tuyamcu 21,2 ; tuyamcu 22,10
backlog ledtable 0 ; dimmerrange 10,1000 ; so59 1 ; so68 1
Rule1
on TuyaReceived#Data=55AA03070005030400010016 do publish2 stat/%topic%/speed 3,0 endon
on TuyaReceived#Data=55AA03070005030400010117 do publish2 stat/%topic%/speed 3,1 endon
on TuyaReceived#Data=55AA03070005030400010218 do publish2 stat/%topic%/speed 3,2 endon
on TuyaReceived#Data=55AA03070005030400010319 do publish2 stat/%topic%/speed 3,3 endon
Rule2
on TuyaReceived#Data=55AA03070005030400010016 do Channel1 25 endon
on TuyaReceived#Data=55AA03070005030400010117 do Channel1 50 endon
on TuyaReceived#Data=55AA03070005030400010218 do Channel1 75 endon
on TuyaReceived#Data=55AA03070005030400010319 do Channel1 100 endon
Rule3
on Channel1>75 do tuyasend4 3,3 break
on Channel1>50 do tuyasend4 3,2 break
on Channel1>25 do tuyasend4 3,1 break
on Channel1>1 do tuyasend4 3,0 endon
I went through these steps and my fan still shows up as a switch. I have tried to customize the classification of the device, but it is either an outlet or a switch. So I am not sure how to fix this. I even cleaned out the MQTT history logs.
Deletethe last line should be >= not >
Deletehere is the whole rule to easily replace
Rule3
on Channel1>75 do tuyasend4 3,3 break
on Channel1>50 do tuyasend4 3,2 break
on Channel1>25 do tuyasend4 3,1 break
on Channel1>=1 do tuyasend4 3,0 endon
you should not be using the device you previously created
Deleteyou should have a new device in the tasmota integration
both the light and fan will be dimmers
as long as you ran both backlog commands
if you type tuyamcu, it should list 4 things
tuyamcu 11,1 ; tuyamcu 12,9 ; tuyamcu 21,2 ; tuyamcu 22,10
if not re-run the backlog commands
if yes, go to your tasmota integration in HA and look for a new dimmer
then click on properties and change the icon to fan
this is meant for zero config in HA other than the icon
Deleteno config.yaml should be used for this to work
all handled by the tasmota integration
we should continue this discussion in discord or another messaging platform.
my username is the same everywhere.
Yep, that was my mistake. I didn't type the backlock commands 1 at a time. too bad there isn't a method yet to assign one of those as a 62 instead of 21,2 for the fan control. This would really make it ideal.
Deletethis config seems to turn on the fan whenever the light brightness is adjusted.
DeleteV2
ReplyDeleteI found 2 minor bugs that have been fixed
Also refactored some of the code (rules)
1- on system boot of the device the rules were picking up the fan speed and starting the fan, this was fixed by stopping rule 2 and 3 on bootup then turning them on after a 5 second delay making sure the values are already read.
2- on reboot of HA it would resend the fan speed even if the fan was off because its syncing values. I added variables to track current state and not allow changing a value if its already that value, effectively denying the fan to start if its already off, unless you specifically change the speed. I had to use mem for most instead of var as var re-triggers when it receives the same value it already has but mem does not do this and survives reboots. As a result there are no repeated commands.
This should work much better and no longer have undesired effects.
module 54
backlog so97 1 ; tuyamcu 11,1 ; tuyamcu 12,9 ; tuyamcu 21,2 ; tuyamcu 22,10
backlog ledtable 0 ; dimmerrange 10,1000 ; so59 1 ; so68 1
Rule1
on Power1#Boot do backlog Rule2 0 ; Rule3 0 ; RuleTimer1 5 endon
on Rules#Timer=1 do backlog Rule3 1 ; Rule2 1 endon
on TuyaReceived#Data=55AA03070005030400010016 do Mem1 3,0 endon
on TuyaReceived#Data=55AA03070005030400010117 do Mem1 3,1 endon
on TuyaReceived#Data=55AA03070005030400010218 do Mem1 3,2 endon
on TuyaReceived#Data=55AA03070005030400010319 do Mem1 3,3 endon
on Mem1#State do publish2 stat/%topic%/speed %Mem1% endon
Rule2
on TuyaReceived#Data=55AA03070005030400010016 do Mem2 25 endon
on TuyaReceived#Data=55AA03070005030400010117 do Mem2 50 endon
on TuyaReceived#Data=55AA03070005030400010218 do Mem2 75 endon
on TuyaReceived#Data=55AA03070005030400010319 do Mem2 100 endon
on Mem2#State != %Var1% do Channel1 %Mem2% endon
Rule3
on Channel1 do Var1 %value% endon
on Channel1>75 do backlog Mem3 3,3 ; Mem4 100 break
on Channel1>50 do backlog Mem3 3,2 ; Mem4 75 break
on Channel1>25 do backlog Mem3 3,1 ; Mem4 50 break
on Channel1>=1 do backlog Mem3 3,0 ; Mem4 25 endon
on Mem4#State != %Var1% do backlog tuyasend4 %Mem3% ; Var1 %Mem4% endon
Yep. I encountered those issues. Was almost to the point of reverting back.
DeleteThe one issue I'm struggling with is the google home integration since it is considering it a 'light' and I have no method to tell it that it is a fan.
you could just tell google set to x %, same as a light, this is how all my fans previously worked through vera as it did not know the difference, its all the same to end user exept you will say 25/50/75/100 instead of 1/2/3/4 but moving forward HA is percentage based for fan anyways, and they are doing away with the backward compatability of speeds by end of year.
Deletealternatively, you could create a fan template that just uses the "fan dimmer" as its percentage template. this would make the device show as an actual fan but you will still have the "fake light" as its the real device, then only show the one you want on your dashboard.
When I reboot the switch, I still get the fan starting immediately. This doesn't happen when I restart Home Assistant anymore, but seems like a slight issue still. Power outage will cause the fans all to start.
DeleteAlso, any change you can offer up the configuration.yaml example for how to achieve the Fan Template over the light?
After playing around some more, it appears that when the switch reboots or power goes off on the house and back on, the fan turns on briefly at full speed (previous set speed, but off), then after 5 seconds goes to speed 2. But doesn't turn off. Is there a way to fix the reboot such that it doesn't change the speed and goes back to the previous on/off state?
DeleteThat is by design. It turns on at full power to kick start the motor.
Delete@Gamerayers
Deletetry changing the ruletimer1 to a higher value than 5
looks like its not long enough of a delay for your switch to complete start up
it then re-enables rules 2 and 3 and it starts
you could also do as suggested by another user and use
poweronstate 0
I have the light working fine (can turn it on and off and dim it) but the fan I only have on/off control. The fan control does not seem to work. For the record I have the ESMLF version of the switch not the treatlife. Any thoughts on what I'm doing wrong?
DeleteDoes it work with the Tuya send commands?
Deletewell, I am sorry to report that I do not know how to do that or what tuya commands to send :(
DeleteScroll alllllll the way up. It's in the article.
DeleteTuya send commands work. So, next dumb question is, do I have to edit my yaml? If so, why do you have different mqtt topics in fan and light section? I assume this is a mistake and used same topic in both sections but now it seem like one switch controls both light and fan....and I can adjust light brightness but have no idea how to add the fan speed selector (total newbie here, no I appologize)
DeleteSo this new setup from @cherettepa works great, I was about to deploy 10 of these switches, and I've been struggling with how to make these control my Big Ass Haiku wifi fans. Using this new method and some node-red, I've been successful in getting it all to work --- except one minor thing I'm coming across:
ReplyDeleteThe lowest two settings on the physical treatlife fan control for the fan speed settings do not always send an update to home assistant, even though I see the updates (although not all the time) in the weblog on the console.. The last two speed settings always work. I just cannot pin down what's going on. If I use the web gui on the switch OR home assistant, it works 100% of the time --- and even updates the physical switch buttons correctly.... It's just the other way around. Unfortunately for me, I need to have the physical buttons work 100% correctly.
Turn on weblog 4 via the console. Go mash the buttons, you should be able to see the status update packet come across. If it is then you know the switch is working fine and it is something in the automation.
DeleteSo I've been working the various configurations here and found something that seems to work better for what I'm trying to accomplish.....
ReplyDeleteOne of the issues I've found with the V2 config above is that every key press saves the config in NVRAM. This will cause the flash to prematurely fail over time. I didn't want that. Also, I've had some race condiitions occur with button pressing and not every button press is registered in home assistant. By removing stuff I didn't need and streamlining things, I've come up with this config for the rule sets....
Those of you really sharp will realize that if I set from home assistant the speed to be 25,50,75 or 100, will not change the switch state --- in my case, this is okay because I rarely need to do that. It also fixes any race condition, and I've extensively tested this with rapid fire switch button presses and control from HA at the same time. No problems.
Rule1
on Power1#Boot do backlog Rule2 0 ; RuleTimer1 5 endon
on Rules#Timer=1 do Rule2 1 endon
Rule2
on TuyaReceived#Data=55AA03070005030400010016 do Channel1 25 break
on TuyaReceived#Data=55AA03070005030400010117 do Channel1 50 break
on TuyaReceived#Data=55AA03070005030400010218 do Channel1 75 break
on TuyaReceived#Data=55AA03070005030400010319 do Channel1 100 break
on Channel1 == 25 break
on Channel1 == 50 break
on Channel1 == 75 break
on Channel1 == 100 break
on Channel1>75 do tuyasend4 3,3 break
on Channel1>50 do tuyasend4 3,2 break
on Channel1>25 do tuyasend4 3,1 break
on Channel1>=1 do tuyasend4 3,0 endon
Commands to also enter (enable rules and disable save state, turn off on power loss)
Rule1 1
Rule2 1
poweronstate 0
savedata 0
If someone has a better way to do this, without writing to NVRAM on each button press and fixing the race conditions, I'm open to other configs.... - Brian
Sorry for not responding until now
DeleteI have not been getting notified of replies despite subscribing to this thread
It seems to work a little while then I find for no reason I am once again not subscribed
I am not experiencing the issue where it powers on after a power outage
however you may need a different timeout period than I have
perhaps its just not completing the power on cycle within the delay specified in rule 1
try using a longer timeout, I have it set to 5 seconds (last part of the last line)
then the next line turns the rules back on
Rule1
on Power1#Boot do backlog Rule2 0 ; Rule3 0 ; RuleTimer1 5 endon
on Rules#Timer=1 do backlog Rule3 1 ; Rule2 1 endon
However, I like your idea of powerstate 0 on poweron
I also like preserving the nvrams life with savedata 0
have you ad any adverse effects from doing this?
Looks like we will need to update our mqtt template - I haven't looked at it yet but noticed my fan increment script quit working.
ReplyDeletehttps://developers.home-assistant.io/docs/core/entity/fan/
Deprecated Properties
The fan entity model has changed to use percentages in the range from 0 (off) to 100 instead of the named speeds. The new model replaces speed and speed_list with percentage, preset_mode, and preset_modes. This change allowed us to expand the number of supported speeds to accommodate additional fan models in Home Assistant.
To maintain backwards compatibility with integations that have not updated to the new model, the deprecated properties will remain until at least the end of 2021. Integrations must update their Turn on function to consume percentage or preset_mode instead of speed.
Name Type Default Description
speed str None Return the current speed. One of the values in speed_list.
speed_list list None Get the list of available speeds. The allowed values are "off", "low", "medium" and "high". Use the corresponding constants SPEED_OFF, SPEED_LOW, SPEED_MEDIUM, SPEED_HIGH.
Is there a way to mqtt publish when the - or + button is pressed?
ReplyDeleteNo, the mcu only sends out to the esp when states change.
DeleteIs this the same procedure for the Treatlife Fan switch without the light control, B08P5D3ZKW?
ReplyDeleteYes. But that one will require a transplant to make it ESP based.
DeleteVery useful doco thanks, I have a slightly different light/fan module but the same concept applies. Has anyone tried using the fan with a google assistant. I have exposed the entity to google via home assistant but the only commands I have is to turn the fan off/on via google. I cannot set the fan speed 1/2/3 at all. Any ideas?
ReplyDeletehave you tried the command "set fan to 30%" etc...
DeleteAre you able to enable/disable the LEDs on the switch?
ReplyDeleteAre you able to enable/disable the LEDs on the switch?
ReplyDeleteHas anyone done a mod on this switch yet to increase fan speed for each mode? My medium on this switch would be around my original fans slow setting.
ReplyDeleteExcept they now come with WB3S :( I only spotted that on the second one I bought.
ReplyDeleteI changed the link a while back to the rebranded one as it is still TYWE3S for now.
DeleteCould you update the rest of the links in your post? 2 of them at the top are still pointing to the one with a WB3S. I actually bought 2 of the wrong model because of this. No big deal - I just did an ESP-12f chip transplant on one, which went swimmingly.
DeleteI then tried a chip transplant on the other, and I hosed the board. Oh well - I'm just glad I scrolled down here to find there was a flashable and cheaper option available!
Missed those other links. I would also expect that model to change as stock is rotated on it. Did you pull down the GPIO15 to ground?
DeleteOn the chip transplant that went well, yes I pulled 15 to ground. It's basically the same as your process at https://www.digiblur.com/2020/12/treatlife-dual-indoor-dimmable-smart.html. I've been using it reliably for a month or so.
DeleteOn the one that went bad... well, I ripped a lead straight off the board. I traced the leads with a multimeter and found a place to solder a wire to fix it, but if this thing is going in my wall, my wife and I would prefer one without PCB damage and a janky wire.
I'll keep you updated if the Esmlife one is still an ESP or not. It should be arriving in the next few days.
It's all low voltage ;) Keep me updated. Thanks!
DeleteMy Esmlfe one arrived today, and it's still an ESP-based chip. Flashed just fine.
DeleteInterestingly, the date code stamped onto the back of the switch housing is actually newer than the code on the Treatlife switches (Esmlfe was 10/2020, where Treatlife was 8/2020). So an apparently newer switch has the older chip. Interesting...
As a side note, a month ago I purchased some Esmlfe push button switches (https://www.amazon.com/Esmlfe-Gang%EF%BC%88NOT-Compatible-Control-Required/dp/B08RRS6SJQ). These were also flashable. Maybe Esmlfe is a brand where they're keeping the ESP8266 chips? I'm not holding my breath, but that would be nice!
Is that just 3 switches in a box? I've seen those before but never understood it really. I'm glad to see they get the name right and not call a 3 button switch a 3 gang when really it is just one gang wide, so kudos to them.
DeleteIt's actually 3 individual switches boxed together with a 3 gang plate. It's nice as you can split out the switches if need-be.
DeleteWith the announcement that Tuya will soon enable local access on their products should I hold off from flashing the device? I just bought the controller using your link.
ReplyDeleteThat's too funny. Don't fall for that trap. They are not doing local.
DeleteTechnically, they are allowing for 'local' control. But, if history has taught us anything, it doesn't means that they are removing the cloud connection. In order for local discovery to work, they must have the connection to their cloud initially. LocalTuya requires a connection to the internet every couple times to allow for it keep running. So with the new Local Tuya situation, the question will be how long local works without any cloud connection.
DeleteI think Tasmota is a better situation... BUT, for Light Bulbs which don't allow for it, or the new chips, I am hopeful that that interval is 6 months+ without cloud.
Sorry just not going to fall for it...and others shouldn't either again. Why do I have to sign up for an account on this local thing?
DeleteLet's take a look at Shelly. I can buy the device, power it up, connect it to my network all without their app. Then I can browse to the web GUI and even enable local MQTT. Now that's local. I could do this very task with a Shelly even if I'm 100% off grid without any internet access. Then icing on the cake is I could push my own custom firmware to it. Now we know Tuya will never do the firmware thing but for the rest of the stuff it is totally doable, wake me when they do.
Yep, and Like I said, Tasmota is better solution. And again, like I said, need to use app for discovery. But if we have a good control VLAN network, what's the big concern. Ultimately, they are discussing how to do local only discovery/implementation. BUT, I agree, it is not very likely that they will allow for complete cloudless solution.
DeleteThat said, I have 14 Tuya bulbs I got free, if I can get them on my network, in a VLAN which is semi-protected, and then disable the internet access and they keep working. I'm all for it. I don't need the tinfoil hat to know that this is better than nothing.
And yes, Shelly, and Tasmota, still better solutions. But free bulbs are free bulbs.
And there you said it.. VLAN and their app. No thanks, I'll just stick with other options and others that don't want to go down the rabbit hole should stick to other true local solutions, Shelly, Zigbee, Zwave, etc. Huge pass on the propaganda pay day on this "local" thing.
DeleteI would question if your shying away from vlans and such, but you have other things in your house which are 'smart' and communicate in some way with the cloud (Smart TV which uses netflix or hulu, smart speakers like google Home or Alexa, smart wifi mesh like Google, eros, tplink, etc.), and your not already working on VLANs, how 'home secure' are you really?
DeleteDefinitely an aside, but for somebody who seems a little tin foil hat, I would question how much stuff you are really doing to keep your home separate.
OP here. Not sure why I'm "unknown". Thanks for the replies. I'm new to HA and my baseline for what I expect is Shelly. All local all controlled by HA either through integration or MQTT. It's crazy how much crap is out there with it's own hub/app. What a heap. Glad you're here digiblur to help us newbies appreciate it.
DeleteI was referring to this video: https://www.youtube.com/watch?v=cd4aUJJl_s0 dude is hilarious but clearly in cahoots with Tuya at some level.
I'm gonna go ahead with your Tasmota flash on this controller. Thanks again!
Typical user has no idea what a VLAN is.
DeleteIf that is the air humping video made to look like a children's cartoon.. I have no comment and no words.
Deletehaha. I'm the unknown guy. Chrome was giving me a hard time with Google Accounts. thx again.
ReplyDeleteWelcome unknown! 😎
DeleteHas anyone had an issue with the light attached to this switch flashing on really quickly when another light on the same circuit is turned on/off? The light attached to this switch is off, someone flips a light (not a smart light) on or off in a nearby room that is on the same circuit. When they do, the light attached to this switch turns on for maybe 1/10th of a second and goes back off. I have 2 of these on different circuits and they both do this.
ReplyDeleteIt's funny you say this. Just last night I thought I saw the light flash but just figured it was my imagination...or it was an illusion from the lightning storm we were having.
DeleteMy kids confirmed that the light indeed flashes randomly. But, it doesn't seem to be tied to anything on the same circuit turning on/off. Perhaps on another circuit something is turning on/off. Anyone else besides Dusty and I having this issue? Any ideas as to why? I am using Charettepa's Tasmota-only configuration rather than Digiblur's yaml method.
DeleteI have seen the light flash issue several times. Most of the time it's from changing the fan speed but there are other times everything was off and it flashed.
DeleteThat is referred to as netural interaction with dimmers. Now how do you solve it....that's a big rabbit hole on the interwebz.
DeleteAnd now....I cannot turn the light off at all. It just flickers randomly when "off". When it is on it does not flicker....only when it is off. Any thoughts?
DeleteI have found that the flashing problem only occurs when a pair of MJ lights elsewhere in my house (on a completely different circuit) are on. This particular pair of MJ lights are a dimmer and a smart switch set up as a group. So bizarre!
DeleteAll done. Works great. Major win. Second on order already from Amazon. Thanks for the writeup. No way I would have ever figured all this out myself.
ReplyDeleteOne thing I do notice is that HA shows the fan as off after HA restarts during my daily Unraid docker backup at 4am. So I wake up with the fan on but the HA app shows it as off. Any ideas how I can fix this?
DeletePowerRetain On in the console seemed to fix this.
DeleteWas just going to suggest this with the script to do the startup poll of all tasmota devices. Cover all the bases.
DeleteThis comment has been removed by the author.
ReplyDeleteSeems that after some Home Assistant updates I have lost the ability to control these. Is there an updated guide anywhere that has a working config. I found this one that looked good with Tasmota auto discovery but I can't get it to work.
ReplyDeletehttps://karlquinsland.com/2021/05/fixing-home-assistant-discovery-with-tasmota-on-the-treatlife-ds03/
Scroll up. My guide has been updated for a few months now. Only changes are needed on the HA side.
ReplyDeleteThanks. I now have a turtle speed working on one.
DeleteThanks for this.
ReplyDeleteHave you considered writing a switch to the iFan03, to avoid the dependency on WiFi? It has a few available points on its back that seem promising.
Actually I had this in my bedroom, I had 3 LEDs and 3 push buttons on an i2c board off the iFan03. I just use RX/TX. But in the 3 or 4 years at this, if my WiFi is down then the power is out. Nothing to do with my internet service provider as they are down a lot but this is all local.
DeleteIssue with fan and new formatting. I am receiving the following error after making the changes. "bad indentation of a mapping entry at line 143, column 5:
ReplyDeletepayload_available: "Online"
^"
Below is the config code for this entity.
fan:
- platform: mqtt
unique_id: BedRoom_Fan
name: "Bedroom Fan"
state_topic: "stat/SW_MBedroom/POWER1"
command_topic: "cmnd/SW_MBedroom/POWER1"
availability_topic: "tele/SW_MBedroom/LWT"
percentage_state_topic: "stat/SW_MBedroom/speed"
percentage_value_template: '{{ ((value | replace("3,","")) | int + 1) * 25 }}'
percentage_command_topic: "cmnd/SW_MBedroom/tuyasend4"
percentage_command_template: "3,{{ ((value | int - 1) / 25) | int }}"
preset_mode_state_topic: "stat/SW_MBedroom/speed"
preset_mode_value_template: '{{ value | replace("3,0", "turtle") | replace("3,1", "low") | replace("3,2", "medium") | replace("3,3", "high") }}'
preset_mode_command_topic: "cmnd/SW_MBedroom/tuyasend4"
preset_mode_command_template: '{{ value | replace("turtle", "3,0") | replace("low", "3,1") | replace("medium", "3,2") | replace("high", "3,3") }}'
preset_modes:
- "turtle"
- "low"
- "medium"
- "high"
payload_available: "Online"
payload_not_available: "Offline"
payload_on: "ON"
payload_off: "OFF"
I forgot to mention that I am running core-2021.12.1 and supervisor-2021.12.1
DeleteCheck out the indentation of the example above. The formatting of the YAML has to be precise.
DeleteThank you, I was able to resolve the issue by just copying and pasting from the example above and replacing the topic name.
DeleteI uploaded a fan card that runs this implementation (@digiblurDIY!).
ReplyDeleteIt is available for download and improvements on my github page:
https://github.com/paulearley/fan-card4
Cool! I will check it out.
DeleteThe lovelace code kept erroring on that and it wouldn't work. Configuration errors detected:
Deletebad indentation of a mapping entry (1:36)
This comment has been removed by the author.
ReplyDeleteIf you have HA, does the new version show up using the new tuya integration? On the old version I just get fan control.
DeleteHey guys just a warning. I previously bought two of these back in July/August 2021 with no issue. But this latest two pack I bought has a ST32 chip labelled "WB35" and is not tasmota compatible. I'm probably going to return this 2 pack.
ReplyDelete2 pack that does NOT WORK ("WB35"):
https://www.amazon.com/gp/product/B086PSPP4X/ref=ppx_yo_dt_b_search_asin_title?ie=UTF8&psc=1
previous purchases that do work (last purchased Jul/Aug 2021)
https://www.amazon.com/gp/product/B08PD39NLF/ref=ppx_yo_dt_b_search_asin_title?ie=UTF8&psc=1
Dang...we knew it was a matter of time though. TYWE3S is a thing of the past and swapping the chip is the way.
DeleteGotcha. I ordered two of the singles and I'll see if the TYWE3S makes a re-appreance. Otherwise how hard is it to swap these boards out. Do you need to use a heat gun to separate?
Deletenot too hard - https://youtu.be/d_HpkIiWC3Y
DeleteThanks for the video link! Would be cool to swap those out and learn how to use a heat gun to desolder.
DeleteLuckily the Esmlfe version from my second link have the TuyaMCU! Win. So if anyone wants to do this, buy it now cause otherwise you'll have to swap the wifi module.
Does this still work as of June 2022?
ReplyDeleteI currently have been waiting for the Inovelli Red Series Fan + Light Switch (Z-Wave) https://inovelli.com/red-series-fan-light-switch-z-wave/ and they have been out of stock for 1.5+ years
I can see the TreatLife switch on amazon as well as Esmlfe switch as well that looks exactly the same as the TreatLife switch
Esmlfe
https://www.amazon.com/gp/product/B08PD39NLF/ref=ox_sc_act_title_1?smid=A1CVKQHA9A78MJ&th=1
TreatLife
https://www.amazon.com/gp/product/B086PPRWL7/ref=ox_sc_act_title_2?smid=A3U2GPXV9J2W2G&th=1
is it still confirmed that they no longer work with Tasmota before I pull the trigger on one of these
Thanks
The ESMLFE one https://amzn.to/3hgfoqX
Deleteok, so the ESMLFE should still work, I will get one and see if I can flash it and report back, thanks
Delete